The Interface
An interface is a physical device that XTension uses to send commands to modules. It can be any one of the supported X10 transmitters or receivers, a UPB PIM (Powerline Interface Module) an analog to digital converter like a weeder module or even a device that XTension doesn't know anything about that you've written the handlers for by yourself via the DIY interface.
What interface you choose depends on what you are trying to accomplish. The rest of this page will concentrate on the original X10 interface the cm11 which is still an excellent starting place for anybody wanting to use X10 devices. A complete list of supported devices is here.
To connect a cm11 you'll probably need a usb serial adaptor as most modern machines dont have any serial ports anymore. Once you have the device physically connected you need to setup XTension to talk to it.
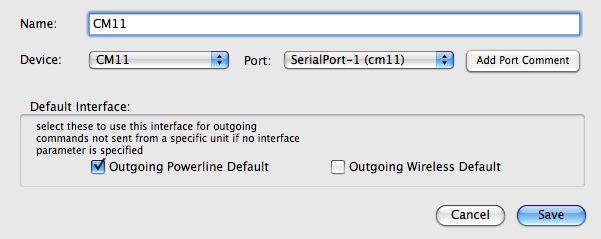
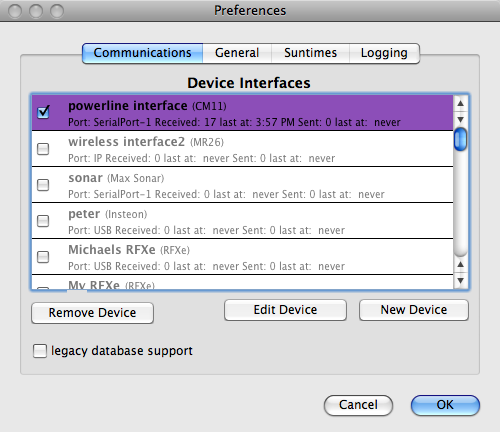
 Open the Preferences window from the application menu and switch to the first tab “Communications” Click the New Interface button to show the interface configuration sheet window. The first popup labeled “Device:” is the list of supported devices and the second, labeled “Port”, is the list of available serial ports. For USB devices the port selection popup will be disabled and will just say “USB” You can also select a remote TCP connection if you have connected the device via an ethernet to serial adaptor.
For your main powerline interface you'll also want to check the “outgoing powerline default” checkbox. With that set any commands for which the interface isn't already known will use the default without your having to specify it by name every time. Any command sent to a unit (like turnon or turnoff) already know which interface you've said that the unit is connected to, but some commands are generic for an interface and since XTension supports any number and combination of interfaces things like sending an X10 All On command will go to the default interface if selected here. If you wish to send those commands to other interfaces than the generic you can do so by specifying the “interface” parameter and passing it the name of the interface. If you set a default you wont have to worry about that.
The “Add port Comment” button allows you to add some descriptive text to the popup list of available serial ports. Many serial adaptors dont let you choose a name for them and will create ports named things like “abc1234AC37” which isn't exactly helpful once you have more than one or 2 connected to the machine. The text in the example screen shown in parenthesis “(CM11)” was added via the port comment system and just makes it easier to remember what port you connected something to a year from now when you want to change something and have forgotten which is which.
Save the settings and return to the communications tab of the preferences window.
 Now you can activate the interface by checking it's checkbox in the list. Once you have a working interface you can move on to create units connected to it.
Advanced discussion, error trapping and lots more details can be had in the details section for The Interface.
Next: The Unit
