Using The Edit Unit Window - The Display Tab
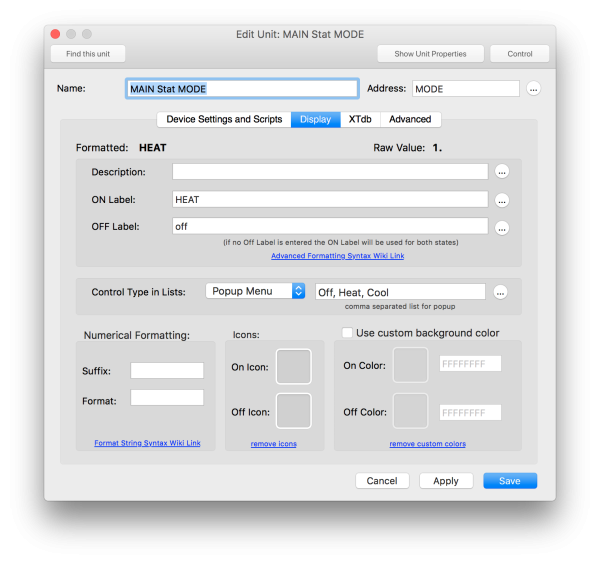
The Display tab of the Edit Unit Window controls how the unit is displayed, how it’s values and labels are formatted and displayed and any colors or icons associated with the Unit.

- Formatted: shows the current formatted display for this unit as it would appear with the current settings. This includes any number formatting, unit of measure suffix or advanced label that is applied.
- Raw Value shows the unformatted value of the unit without any number formatting or other adjustments applied.
- Description this is a large user field that can contain any information about the unit that you wish. Clicking the “…” button to the right brings up a larger edit sheet to make it easier to type larger amounts of information in this field. You can access the Description via the Set Description Of verb, or get the description via the Description Of verb. The description can be displayed in any unit List window. It can also be displayed in Views and Web Remote pages as well as used to create custom controls for both interfaces by including simple or even very complicated HTML formatting code.
- ON Label and OFF Label if you wish to display some other label than ON/OFF or the units value you can assign those values here. For a door sensor you may wish to display OPEN or CLOSED. The values of both these fields can be accessed and changed by scripts using the xtOnLabel and xtOffLabel properties of the xUnit object. The labels are displayed anywhere the value of a unit would be displayed and also in Views or Web Remote displays. The labels can also include very versatile Advanced Label Syntax for displaying combinations of data or selecting values from a list without writing any scripts at all.
- Control Type In Lists This sets the control type that you wish to display for this unit in any List windows or Web Remote Lists that it’s included in. The Toggle control is the default, other options are Buttons, Popup, Text Field and None. For a Popup control you must supply a comma separated list of the options that you wish to include in the popup. The value of the unit will select the corresponding entry in the list for display. Selecting a new popup value will set the value of the unit to it’s index. In the example above the Unit is an HVAC Mode unit with 3 valid values, 0 for off, 1 for heat and 2 for cool. Instead of having to remember that and set the value manually with this control you can select the text values from a popup and have the proper value be set. See Controlling Unit From Lists for more info on using and configuring the Unit List Control Type. The control type was added in XTension version 9.4.
By filling in the comma separated list of values you enable the ability to use enumerated values with the Set Value command. When setting the value of the above example you would not have to remember that numerical index for the “cool” setting is 2. You could simply do a:
set value of “my unit name” to “cool”
and as long as the string you pass matches one of the comma separated values it will set it to the proper numerical value under the hood. If you set the value to a string that is not in the list an error will be logged and the value will default to -1. No applescript error will be returned however so your script will continue to run.
- Suffix sometimes also called the “Unit Of Measure” this is just appended to the end of the formatted value display where it’s used. In the example above it’s just a “w” for watts. If it’s a temperature sensor you might wish to append “°F” to the end of the value. Suffix is available to scripts through the Unit Of Measure property of the xUnit class.
- Format The Format string contains information for how to format the numbers. This uses the same syntax as the Format Number verb and can be used to limit decimal points or add commas or any number of useful functions. This is accessable to scripts via the xtFormatString property of the xUnit class.
- Unit Icons If you have graphics that you would like to use to represent units place them into the “Icons” folder which is created alongside the XTension dictionary and they will be available here. Click either image well to set or change the icon. You will be presented with a list of graphics files found in that folder to choose from. You can set the icons via scripting using the Set On Icon For and Set Off Icon For verbs and pass the name of the file. Unit icons can be displayed in lists as well as unit icon controls in Views and the Web Remotes.
- Custom Background Color by default XTension uses green to show a unit that is in it’s OFF state, and red to indicate a unit in it’s ON state. You can setup custom colors for each state that will show in list views as well as View and Web Remote controls for this unit here. You can also change the values from a script using the xtOnColor and xtOffColor properties of the xUnit object.
PREVIOUS Edit Unit Dialog
NEXT Edit Unit Dialog - XTdb tab
