Table of Contents
Controlling Units From Lists
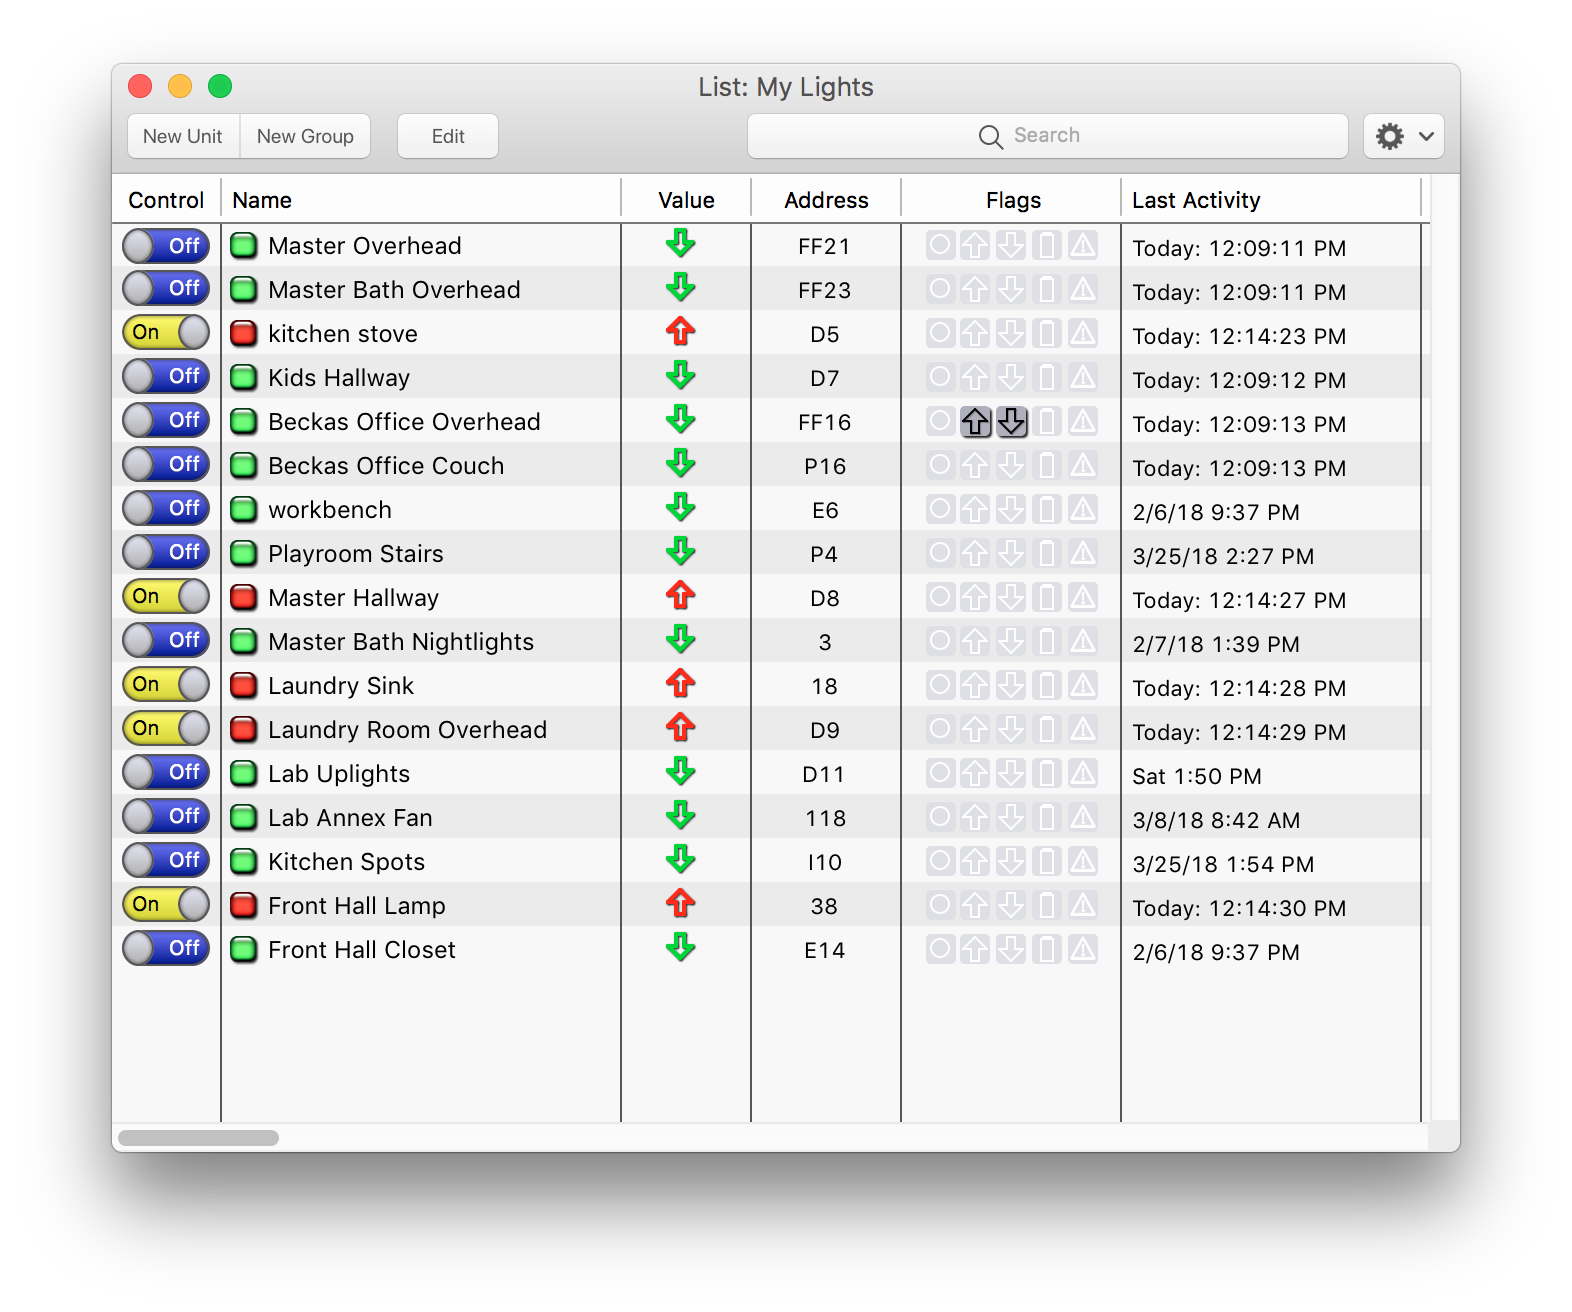
The List is the main display, control and organizational feature of XTension. All your units will always be in the Master List and you can create any number of other lists. Those lists can each have different display options and layouts. They can be displayed either in the App or on the Web Interface.
List Control Types
By default a new List window will show the Control column in the first column of the window. You can add or hide the column by control-clicking in the headers of the List and selecting the show or hide menu items for the column you wish to add or hide. You can drag it to a new position or resize it like any other column. You could drag the control column so wide that the toggles look silly, don’t do that. If you have hidden the Control column you can still control the unit. Double clicking any row will toggle the unit. Clicking on the Value column or the jewel status display in the Name Column will bring up the Detailed Unit Controls with more control and timing options. (see below)
By default Units will display with the Toggle control type. You can change to any of the other types or None by control clicking on the unit row and selecting the “Set Control Type” menu or by selecting the control type for that unit in the Edit Unit Dialog.
Toggles
For a Discrete (non-dimmable) Unit a toggle control will show the “On” and “Off” labels. If you set On Label or Off Labels in the Edit Unit Dialog then those labels will be shown instead. If the unit is dimmable the value, along with any formatting and suffix options you have setup for the unit will be used for the display. If the On or Off Labels are set in a dimmable unit they will display instead of the numerical value.
 Clicking the grey paddle of the control will toggle the state of the unit. Clicking in the background of the toggle, not on the paddle, will cause the detailed unit controls to popup for that unit offering more control options. (see below)
 If a unit has it’s Ignore Clicks In List setting turned on then first level clicks in the list control will not immediately toggle the unit. This is to keep accidental clicks from turning on or off important units. It’s also useful for devices that you wish to display in the control column but that cannot actually be controlled like a temperature sensor. The Paddle of the toggle is not shown and the label or value is displayed centered in the paddle background. Clicking on the background will bring up the Detailed Unit Controls and from there you can control the unit even with the Ignore Clicks setting selected.
Buttons
 For some units it may make more sense to be able to specifically send an on or off regardless of the current state of the unit. Some devices might be locally controlled and have not sent an update or been polled in which case the database might not reflect the true state of the unit. With a toggle you’d have to click it twice to get the device into the desired state in this case. The button control will display the current state, but you can click either button to send an On or Off regardless.
Text Field
 The Text Field control will display the raw numerical value of the unit. If you click once in it the field will change to a regular edit field and you can quickly type in a new value. Press return, click or tab away from the field to send the new value. Press Escape to stop editing without sending the new value.
Popup Menu
 Creating a popup menu makes sense for units that require more states than just on and off but isn’t truly dimmable. You might want to use the popup control for the Mode of a Thermostat. Normally a thermostat mode unit is dimmable, but only a few numerical values make any sense. 0 for Off, 1 for Heat, 2 for AC, etc. In the Edit Unit Dialog you can enter a comma delimited list of values that will display in the popup. To generate the popup shown to the left you’d enter “Off,Heat,Cool”.

You might also create a pseudo unit for the Mode of a room. Create a popup with the values “Off,Nightlight,Low,Normal,Full” and in the On script of the pseudo unit check the Future Value and setup the values of the various lights based on the value that was selected.
Detailed Unit Controls
 More control possibilities are exposed by the Detailed Unit Controls window. You can open this window for any unit by clicking in the background of a Toggle Switch control, by clicking the jewel status indicator in the Name column or by clicking on the Value column for that unit. If you are navigating with the keyboard pressing the left arrow key will bring up this window for the selected unit.
What is displayed in the Detailed Controls window depends on the capabilities of the Unit. If the unit is dimmable you’ll see the value field and the dimmer slider. If not you’ll only see the On/Off controls. All Units will get the Block/UnBlockbuttons as well as the Remove Unit Events button.
 If you have the List Control Type for the unit set to Popup then the same values you have configured for that will be offered in the Detailed Controls window. Making a change to the popup sends the new value immediately.
Time Frame for Commands
 By clicking the disclosure triangle in the upper left of the window you can expose yet more information and controls. In addition to displaying the Description of the unit you’ll also get some quick click buttons for incrementing the value or jumping to a specific value.
You can create timed events to send values using the In/For selection here. The In fields holds the time before the action is performed. The For field will return the unit to it’s current value after that amount of time. To include a time frame with a command set the values that you wish and then perform the action and the time frame will be included. You can include a time frame for an On, Off, Set Value and Block/Unblock command. When setting a value use the Value field and click the Set button once you’ve setup the time frame fields. Using the slider sends the value instantly regardless of the in/for settings.
When using the For field remember that the unit will return to it’s current value at the end of that time. If you turn on the unit for 10 minutes and the unit is already on then nothing will appear to happen at all as it’s already on, and will return to being on after the timeout. If you want the unit to turn off in 10 minutes send it an Off command In 10 minutes and not a turn on For 10 minutes.
In/For commands automatically create unit events. If you’ve created several such events and want to remove them so you can be sure what the Unit will do you can use the “Remove Events” button. That will remove any automatically created events for the unit, that is any event that was created via the In/For parameters. This includes automatic events that were created by scripts or other sources and not just your session in this interface.
Color and Color Temperature Control
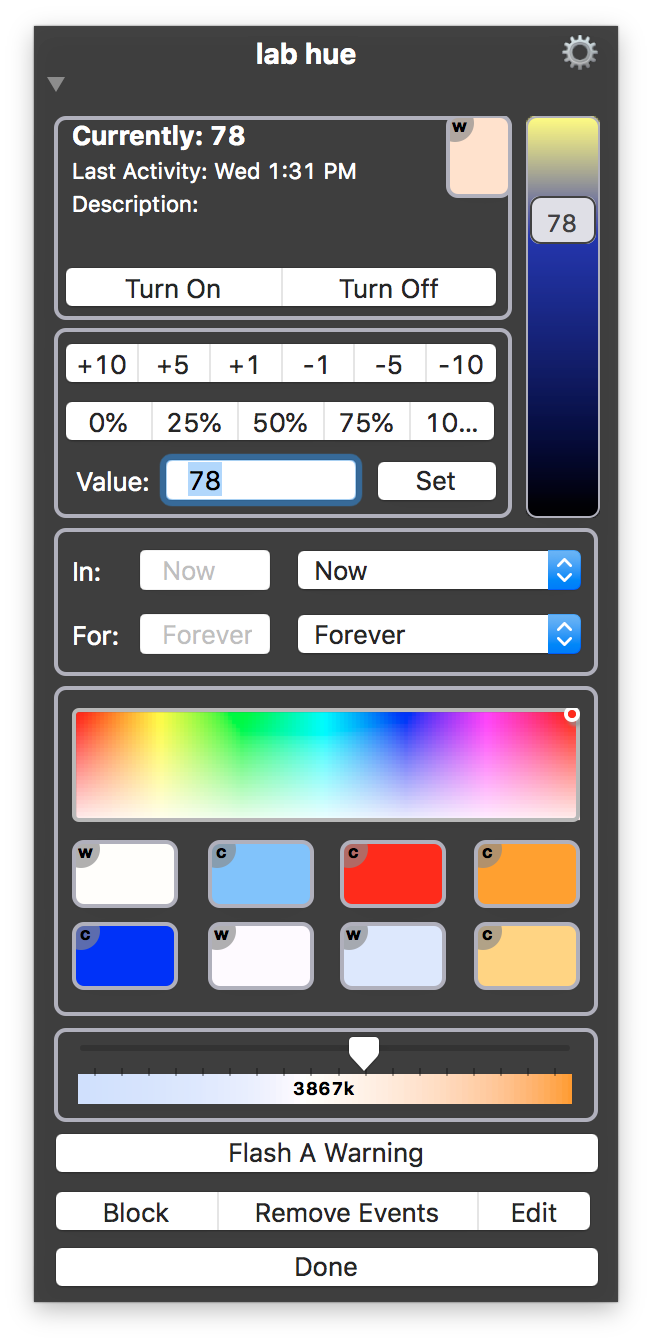
If the Unit you’re controlling has color or color temperature support then additional controls will be displayed in the Detailed Controls Window.
In this example the Unit is controlling a Phillips Hue Color Bulb so is displaying both the Color and Color Temperature controls. A best approximation of the color currently being shown by the device will be displayed at the top of the window. By clicking on that swatch the system color picker will be presented and you can pick a new color from that. You can also use the color pallet to select from a range of colors.
If the device is capable of both color and color temperature then the swatches will display a “c” if it’s a color preset or a “w” if it’s a color temperature that is being shown right now.
If you like the current color being displayed by the swatch and the bulb you can control click on any of the color preset swatches to save that color to it. Presets can hold both color or color temperature values. Clicking on a preset will recall that color or color temperature to the bulb.
History
- Controls in the list window were added in XTension version 9.4