Table of Contents
Phillips Hue
Note that this page is for the new Hue plugin that was released with XTension version 9.4.17 on 4/20/2019. For information on the original Hue plugin please see this page.
 XTension has full support for the Phillips Hue Hub supporting the full color suite as well as the color temperature suite for all supported bulbs and lamps. XTension also supports any remotes, sensors and “clip” sensors that you may have attached to your hub.
Color looping and performing alerts are also supported.
Connecting to the Bridge from XTension
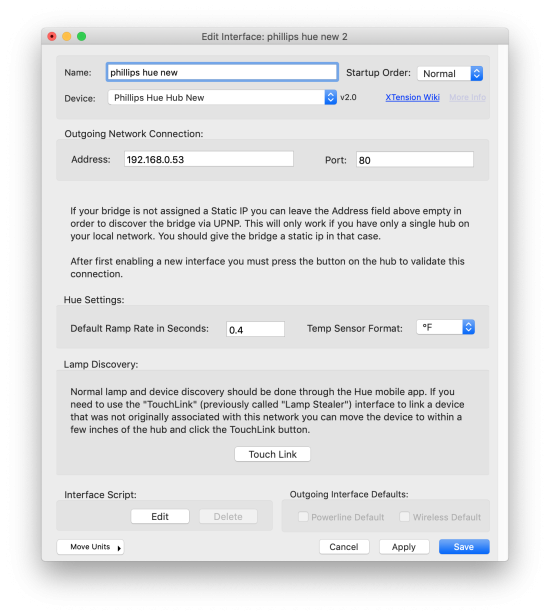
If you have not set a static IP address or made a DHCP reservation for your hub you can leave the Address field blank and the plugin will attempt to find the Hub via UPnP. If you have set an IP for it then enter it there. Connecting via a static IP is faster. A static IP is required if you have more than one Hub on your local network as otherwise you will randomly connect to one or the other. Note that the UPnP discovery does not use the meethue service and so no internet connection is necessary.
The Port should generally be 80 unless you’re connecting to a remote hub via port mapping on a remote machine.
The Default Ramp Rate is the fade time in seconds that will be included with any commands for which you do not specifically specify a ramp rate. The Hue hub’s internal default is 0.4 seconds but if you wish the lights to by default move faster or slower you can enter that here.
Should you have any temperature sensors connected to the hub you can then select the format you wish the temperature to be reported to XTension in. The Hue motion sensors also include a temperature and light sensor. All temperature units created will show the temperature in this format.
At this point you can save the interface and enable it from the Interface window. If this is the first time you’ve started up the interface it will write to the log that you need to press the button on the top of the hub. Once you’ve done that the status line in the Interface window will change from “press the hub button” to “Connected” if all is well and any devices you have connected to the hub should be created automatically in XTension. With the exception of Buttons on any remotes, see below for more info on the use of remotes like the Hue Tap or other remotes.
Once the interface is enabled and has a user created by your pressing the button you will also be able to use the “Touchlink” button to steal a lamp from another network. This requires that the interface be already setup and connected and will be greyed out if the interface isn’t running. This lets you assign a lamp to this network that has previously been assigned to a different network or that the Hue won’t connect to for some reason with it’s regular add new lamps functions. Normally you would add new lamps via the Hue app, but they don’t seem to have an obvious interface to the Touchlink feature so I’ve added it here. In order to work the lamp must be powered on and physically touching the top of the hue hub. This is a very low power transmission so that you can’t steal your neighbors lights. You may also have to do a factory reset on the lamp in question before this will work. For some lamps it’s turning on and off the light 5 times once a second, you should look up the proper method in the documentation for the lamp. After clicking the button it will write to the log that touchlink is active, or the error if a problem occurred instead.
Controlling Color
 One of the advantages of the new Hue plugin is that it uses the proper gamut corrections for the various lamp types as reported by the hub so color representations should be more accurate than in older versions. This plugin supports non-dimmable hue devices, dimmable only devices, color temperature only devices, color only devices and the most common type which support both color and color temperature. When controlling a bulb manually from either the web interface or the local interface the proper controls will be displayed based on the capabilities of the lamp allowing you to select colors, color presets or color temperature.
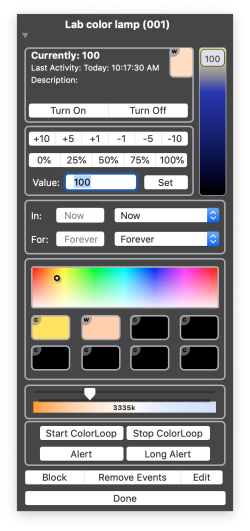
Click on the Jewel in any list to bring up the detailed control window. On top are the standard light and brightness controls that are available for all dimmable devices. Below that will be the color selection controls and below that the color temperature control section. This is now standardized for Hue and other lights. Though the hue does not use the actual color temperature value to set it’s color XTension will translate between the two and will show you a standard mired color temperature slider.
The current color or color temperature are displayed at the top of the window next to the dimmer. A small “w” will be displayed if the current color is a color temperature. A small “c” will be displayed if the current mode is displaying a color. You can click this control to being up the standard system color picker to choose a specific color.
A color panel is displayed and you can click anywhere in this to select a color to display. On the web interface this is simplified with fewer choices so as to be easier to tap on something specific.
Below that are the color preset selections. They also display the “c” or “w” to show which mode of color they represent. In order to save a color preset from the current setting of the lamp control click on the preset you wish to program and select “Set preset from the current color”. You can also set a color preset from the Edit Unit window for the Unit. The help tag for the presets will display either the RGB values of the color they are set to or the color temperature in °K. hover your mouse over one to see that.
The color temperature slider will let you select a color temperature to send to the lamp. Selecting a color temperature will change the lamp’s mode to color temperature from color if it was previously displaying a color.
Below that are some controls that are specific to the Hue bulbs. If the lamp supports color you will see the “Start ColorLoop” and “Stop ColorLoop” buttons. All Hue bulbs support the “Alert” and “Long Alert” functions. Alert changes the brightness of the bulb for a second or so and then returns to the preset brightness. Long Alert will do that over and over for 15 seconds.
Scripting Color and Color Temperature
All XTension verbs that you would use to control a lamp will also accept a color temperature or color value. The standard way of expressing colors in XTension is via their HTML format as “RRGGBB” so “FF0000” would be full red, “00FF00” would be full green and so forth. Additionally you can include hue/saturation and x/y values though these may be less accurate in their translation to the physical devices. The RGB values are specifically tuned to the individual devices. When possible you should use the RGB values.
for all color interactions the brightness is taken from the brightness of the bulb not the brightness of the color. For instance turning on a lamp with a color of “0000FF” will result in exactly the same color display as turning on the bulb with the color “000033” as the brightness of the color will be the current value of the lamp and not the value inherent in the color. This is also why the “value” for hue/saturation/value is missing from the verbs below as it is taken from the value of the device.
turn on “hue device” rgb color “AAFF22”
returns the bulb to the last level that XTension knows about and sets the color.
brighten “hue device” to 75 rgb color “AAFF22”
sets the value to a specific level and sets the color
brighten “hue device” to 100 color temperature 2700
will change the lamp to white or color temperature mode and set the color temperature to 2700. Note that previous Hue plugins required you to use the internal numerical value that the Hue bulbs used to represent color temperature, this is no longer the case and all color temperature values for all devices should be passed in actual °K.
If you wish to use hue/sat or x/y values to set colors that format is below. All hue, and x,y values should be decimals between 0 and 1.
  turn on "hue device" hue 0.1234 saturation 200
  turn on "hue device" xValue 0.134 yValue 0.441
If the bulb is off and you wish to change what the color or color temperature that will be displayed the next time the bulb is turned on without specifying these values you can use the sim preset command:
sim preset "hue device" to 100 rgb color "AAFF22”
Scripting Alerts and Color Loops
Note that these are different from the original plugin which used the Blink verb. The Blink verb is supported for backwards compatibility but for new scripts you should use these functions.
To preform a short alert via a script:
tell xUnit “hue device” to shortAlert()
and a longer 15 seconds alert:
tell xUnit “hue device” to longAlert()
To cancel a long alert that is in progress:
tell xUnit “hue device” to stopAlert()
to start and stop the color looping feature via a script:
  tell xUnit “hue device” to startLoop()

  tell xUnit “hue device” to stopLoop()
Adding Ramp Rates
All the commands support the “rate” paramter. You can fade slowly by specifying a longer number of seconds, or very quickly by specifying 0 or 0.1. If you wish to send a value less than a second, or including fractions of a second you may include a decimal fraction of a second.
TurnOn “hue device” rgb color “55FF22” rate 5
would take 5 seconds to change from the currently displayed color to the new color. Or you can fade from a warmer color color temperature to a cooler one at some point in the day:
brighten “hue device” to 100 color temperature 3500 rate 30
Note that previous versions of the plugin used the low level value in 0.1 seconds that the hue uses internally so to fade over the course of 1 second you would have had to specify a rate of 10. That is no longer the case, the new plugin uses the XTension default of seconds and will handle that conversion for you.
Hue Sensors
Any motion or temperature sensors added to the Hub should just show up in XTension without any other configuration needed. If the sensor supports multiple sensor values they will each get their own unit in XTension. For example the Motion sensor also has a temperature and a light sensor in it. That device will create 3 units in XTension for Motion, or presence, temperature and light level.
Hue Remotes
All remotes will create a “parent” unit with the address of the remote. This unit is necessary to send the button events to the proper button units but will not otherwise change state. Adding code to it’s on/off scripts will not be executed. The unit will however display the battery level and error status of the device and can be used for that.
If you wish to use your remote directly in XTension without having it linked to any hue devices directly there is a way to set it up to do that. Normally a remote button must be linked to at least one group or scene or lamp in the hue hub. During the setup of a new device in the Hue app however there is an option at the bottom to “setup in separate app” that will leave it unconnected to any specific hue devices. The units in XTension will still receive the events and you can use those scripts to control non-hue devices then, If you have already setup the device in the hue and wish to remove it’s direct association with all hue devices there is a button for “reset” in the setup for the remote, after that you can select the “setup in separate app” button and it will function normally in XTension while not controlling anything in the hub.
Conversion from old plugin
The documentation for the old plugin is here
As of this first release there is no attempt to convert units automatically from the old system to the new one. If you wish to convert an existing install you should change the interface type from the old plugin to the new. After doing that but before enabling the interface you can edit each unit and change the device type popup from the older values to one of the new unit types. It should be obvious which corresponds to which but there are more device types now than there were as we support more lamp types and there is a new unit type for remote button. After selecting the proper values for the units you should be able to enable the interface and have it pick up on any existing units. The addresses should not be any different from the old plugin to the new plugin, only the unit type has changed.
Note that controlling the lamps via scripting may have changed. The Blink verb is no longer used for alerts and color looping but the specific commands shown above. The color temperature no longer is the low level internal value that Hue uses, but a standard mired color temperature in °K so you may have to change any verbs that you used to set those with the old plugin.
Color selection is now much more accurate than it was with the previous plugin. You can still use hue/sat to set the colors, but you should verify that they are still the same as you like and switch to RGB for any new commands that you might write as those are better converted internally and adjusted for the specific hue lamps.
Ramp rate values are now in fractions of a second. Previously the plugin required that you enter multiples of the low level hue interval of 100 ms. It’s now standardized on seconds. To perform a fade over 2.5 seconds just specify a rate of 2.5 to fade over 2 minutes use the standard applescript notation like “rate 2 * minutes”

