Table of Contents
 ngrok.io Is a secure web tunneling service that can provide an https link for your web interfaces or other http resources such a websococket. It can also provide a secure share of files in a directory to any browser. ngrok is not affiliated with XTension and we don’t get any kickback from your using them. At least their basic subscription for $5 a month is required in order to usefully forward a web interface. While I have integrated a user friendly interface to ngrok in XTension it is not necessary in order to share your own interfaces nor is it the only such service available.
The advantage to using ngrok is that it does not require creating your own self signed TLS certificates and configuring your router for NAT passthrough and then setting up a dyndns account. No access to your router configuration is needed as all the connections are outgoing from XTension to their servers. If your router gets replaced or rebooted by the cable company you won’t lose your connection. This can make it easier and faster to get working than setting up all those other requirements.
NGROK Configuration:
You can experiment with their free account, but this is not supported by the built in configuration tools in XTension. They create a random address for your passthroughs that changes with each time it starts up. To experiment download and install their mac client and after adding your access token you can setup a temporary XTension passthrough for testing by noting the port of one of your web services and issuing a command like:
ngrok http 8080
or whatever port number is appropriate. The interface brought up in the terminal will show you what the randomly generated hostname is for your testing. Once you have verified that it works and will be of use to you then you can sign up for one of their paid service tiers and configure it in XTension.
The XTension tools require at least their basic account and that you use reserved subdomains of the ngrok.io address. After you create your account you can reserve subdomains from the Endpoints Domains section of the dashboard. You’ll need a separate endpoint name for each service you wish to tunnel through their service.
When you reserve a domain name be sure to select the correct region for where you’ll mostly be connecting to it. That setting must match what you setup in XTension later.
The only other setting you’ll need from their site is your authentication token That also needs to be entered in the XTension settings in the next step.
XTension Configuration:
First you need a mobile or regular web interface to share and you’ll need to know the port that it is running on. Only non-ssl unencrypted sites can be shared through the XTension interface. Since all communication to and from their site is encrypted with their tls certificates this does not reduce your security any, it just greatly simplifies managing the security certificates. You do not need to expose the non-ssl version of the interface to the internet, only make it available on the local network.
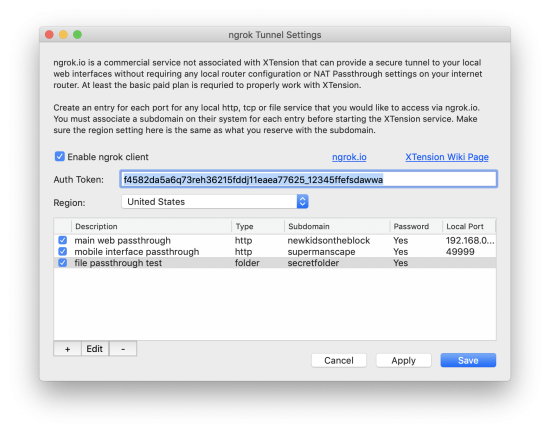
 You’ll find the ngrok settings under the Window menu called “ngrok.io Tunnel Settings” selecting that opens the ngrok setup window. Copy and paste your authentication token from your account and set the same region as you setup when reserving the domains. Check the Enable checkbox and then when you save the changes it will startup the interface.
Now you are ready to being adding individual tunnels for each interface. You can create web service tunnels as well as directory listing shares. Click the “+” button below the list to begin adding tunnels.
Creating a Web Service Tunnel
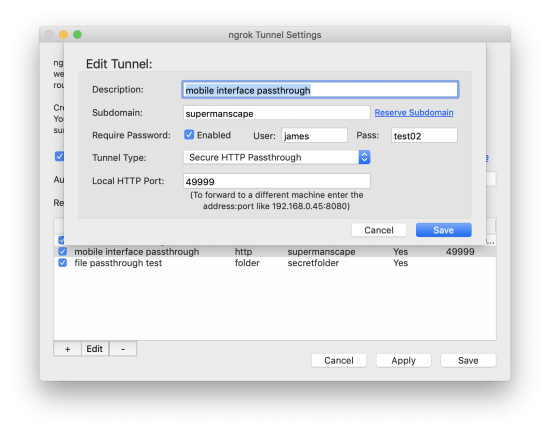
 Clicking the plus button will drop down the edit tunnel sheet window.
Description: A short description of the service to remind you what that one is for.
Subdomain: This must be the same as the subdomain you reserved above. For a basic account you can reserve up to 8 subdomains. It will be the first part of the link to your service, for example: https://subdomain.ngrok.io/ or from the example in the screen shot: https://supermanscape.ngrok.io/ It must not contain any spaces or other characters that would not be valid in any other dns name. Note that while the local service you are sharing is NOT encrypted, the link from their site is secure.
Require Password: Most XTension web interfaces can be configured to require a password or a pin number to access however this setting will provide another level of security. This way someone without the user and password will not even be presented with the logon of your web interface and them trying various easily guessed passwords will never even reach your machine and waste your CPU cycles. Since the connection to the ngrok.io site is fully encrypted the user and password are not sent in the clear and cannot be “sniffed” while being sent across the internet. Note that these are completely separate from the pin or password you setup in the XTension interface and do not need to be the same, and probably shouldn’t be the same.
Tunnel Type: For the moment only http and file sharing tunnel types are supported. To share a web service select “Secure HTTP Passthrough” from the tunnel type popup.
Local HTTP Port: This is the port you are running your web interface on locally. Make sure to use the port number of the non-SSL version of the interface. When tunneled to ngrok it will run on the standard https port regardless of what port it is running on locally.
Forwarding To A Different Machine:
The above settings are for tunneling from the XTension machine. There is no reason that the tunneled interface needs to be an XTension interface. Any http type interface can be forwarded by this service and the XTension interface to it. Additionally the service does not need to be running on the same machine as XTension on your local network in order to be tunneled.
To tunnel to a web interface on any other machine on your local network you need to enter it’s address and port into the Local HTTP Port field. Say you had another program running on a raspberry pi on your network that you wished to tunnel and it’s iP address was 192.168.0.45 and it’s port was 8080 the correct entry for that field would be “192.168.0.45:8080”
File Sharing:
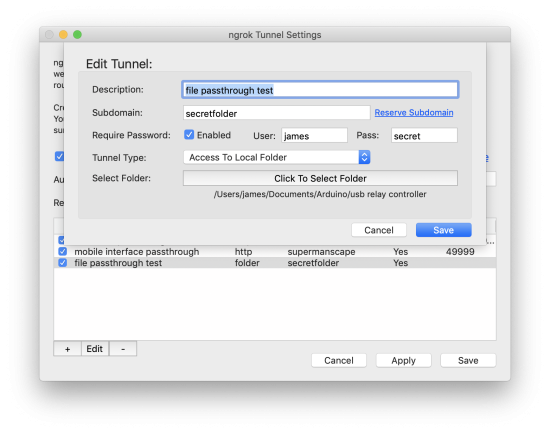
 The ngrok service also supports directory listing type shares. In order to set this up change the Tunnel Type popup to “Access To Local Folder.“
The absolute path of the folder being shared will be shown in smaller text below the select folder button in the interface. Click the select folder button to select an initial folder to share or to change an existing one.
All other settings are the same as for sharing an http resource.
Please note that if you do not set a user/password for this share then that folders contents will be available to anyone who happens across your reserved subdomain. This could be useful for temporarily sharing files with someone but you should not expose any other resources to the world at large without a user and password set.
Other Considerations:
As of this first release error handling is minimal as I haven’t been able to generate very many. That being said I do not know yet how reliable this service is going to be. I would not disable other modes of connecting to your machines so that you have more than one way of reaching home if something goes astray.
Don’t use the ngrok link when accessing your machine from your local network. The overhead of the encryption as well as the round trip to the internet and back would add unnecessary slow downs when you’re already on the same local network. On a computer use a direct link when you are at home and only use the ngrok link when you’re away from home. On a mobile device like an iPhone you can create 2 shortcuts for reaching a web interface, one for the local network and another for when you’re outside.
I have seen some errors occasionally when changing the configuration and restarting the client process in the background. Watch the log file after saving new configuration to make sure the background process does not immediately quit with an error. In every case I experienced just trying to enable it again in a few moments worked to get it going again. If I can figure out why this is happening I will fix the problem in a future version.
The ngrok configuration file created by the XTension interface is saved in your XTension Support folder inside your Documents folder and is called ngrok_config.yml Don’t edit this file manually as it is re-created each time the process is started or whenever you make any changes to the settings.
History:
- The ngrok integration was first added to XTension in version 9.4.39 in March of 2021
