Table of Contents
xBee Radios
 xBee radios are one of my new favorite things for connecting home made sensors and devices. Each one has several pins that you can read into xTension units or control from xTension units as well as a serial port that you can use to connect to an arduino or other device. With the help of a level shifter you can even connect RS232 devices such as the W800 or Ztroller.
xBee radios implement the ZigBee protocol of mesh networking, so range can be extended indefinitely by just adding more xBee's in the middle. An XTension hosted xBee network could easily scale to hundreds of nodes.
Though they are ZigBee protocol devices, you cannot yet use them to control ZigBee light switches and other home automation equipment. Those require additional software that is not part of the xBee programming.
Supported xBee Devices
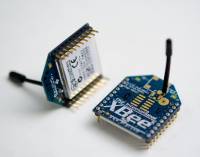
XTension supports only the Series 2, 2.5 and series 3 radios The series 2 radios come in a “regular” version with a lower power output and a “pro” version which is more expensive but has much higher output and range. Several antenna configurations are available, a chip antenna on the board, a short wire antenna as pictured above and an RPSMA connector for attaching an external antenna. Any combination of regular or pro and any of the antenna configurations will work fine. There are other non-compatible models of xBee such as the 900mhz long distance devices and wifi devices that are not compatible with XTension. (at least not with the xBee interface, those other devices can be used to create a long distance serial port or other communications that could easily be connected to XTension separately)
You'll need at least 2 of them to do anything. One connected to XTension as the base station and another to talk to. You will need a “breakout” board that has either serial or USB to connect this one to the computer. I use 2 different ones here, This USB one from sparkfun as well as one of these from adafruit.com They are both excellent.
The cheapest xBee node board is This empty breakout from Sparkfun.com For about $3. You'll need to purchase the headers separately, do not just solder it down to the board. This provides no level shifting or power regulation. My favorite board is this $10 board from adafruit.com it has both onboard power regulation and a level shifting chip for the serial data. You can connect this board to almost anything through it's serial port, including rs232 devices and power it easily from a 5V wall wort. Any of the Arduino/xBee shields should work fine also and will provide for level shifting as well as power regulation.
Configuring your “coordinator” xBee Radio
The good news is that Digi has finally released a version of the configuration program for the Mac!
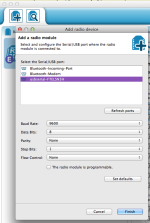
 The xBee connected to XTension is called the “coordinator” and requires different settings than the remote nodes. To create your coordinator you’ll need to connect your xBee to your Mac via one of the USB interfaces mentioned above. Once it’s connected run the XCTU app from digi. Click the “+” button in the upper left hand corner to add a new xBee to the list. You’ll get a dialog where you can select the serial port and various other serial port settings. The defaults will probably work fine for a new xBee, but if you’ve made changes to the serial port settings or are recycling an unknown xBee then you may get an error after scanning. The solution is to unplug the xBee from the interface board, NOT the board from the computer, and then when it asks you to plug it back in. It will then be able to find the radio no matter what the settings. Once it’s listed on the left hand side double click it to load all the xBee configuration settings for editing.
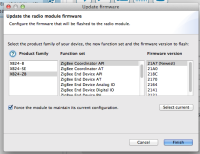
The first step is to update the firmware by clicking on this button. 
 The proper “product family” should already be chosen, but for every device we’re going to work with it should be “XB24-ZB” the function set must be “ZigBee Coordinator API” and select the “Newest” labeled firmware version from that list. Again you may get a communications error that doesn’t really indicate a problem. While the error message is displayed pull the xBee gently off the board, wait a heartbeat and plug it back in. Be careful to align the pins properly when re-inserting it’s easy to be off by one and then it definitely wont work.
- unless otherwise noted here you can leave everything in here at it’s default setting. The line in the program should be grey, if it’s red or blue open up the get info panel by clicking the i with a circle around it on the left and re-enter the default and click the red pencil to write it to the device.
- PAN ID you need to create a unique 4 byte network ID. This is what keeps your xBees from talking to your neighbors. 8 characters of hex like DEADBEEF or 12345678 or AF110011. Once you’ve chosen it you can click the red pencil icon to write it back to the xBee. Make a note of this as you’ll want to enter it into the same parameter of any xBees you want to connect to your network.
- BD Baud Rate set the baud rate to 57600 which is option 6 in the popup. Then click the red pencil to write it back.
- D7 DIO 7 Configuration set flow control to “disabled” and write it to the device.
NOTE: If you’re mixing old and new or pro and normal xBee’s they may have different range of channel frequencies. I just spent 2 full days trying to figure out why I couldn’t get any radios in a new install to talk to each other and it turns out that the coordinator was picking a channel that my client xBee’s couldn’t work on. So you should check that the second parameter “SC” has the same value in all the xBee’s on your network.
To further complicate channel selection and radio reception you should have a look at Choosing Channels in an increasingly crowded 2.4ghz spectrum. You should consider choosing the channels that your different overlapping networks operate on rather than letting them “automatically” choose them to make sure that you dont wake up one day a year from now and find that your Hue Hub has picked the same frequency as your xBees and that nothing works.
Special xBee Commands in XTension
It can be useful to send arbitrary data out of the serial port on an xBee that doesn’t follow the Arduino protocol as is the expected default. To send data to a specific xBee radio’s port use the send data verb with the following formatting. The string you pass should begin with the xBee radio address followed by a semi-colon and then the data. You cannot send a semi-colon in this manner however.
send data “43F4E6DD;this is my data” & return interface “name of your xBee interface"
You can also send any AT command to any radio in a similar way. In the send data command this time there will be 3 fields separated by a semi-colon. First the xBee address, then the 2 character AT command followed any any data that the command might require.
send data “43F4E6DD;XT;1445” interface “name of your xBee interface”
