Table of Contents
Control By Web
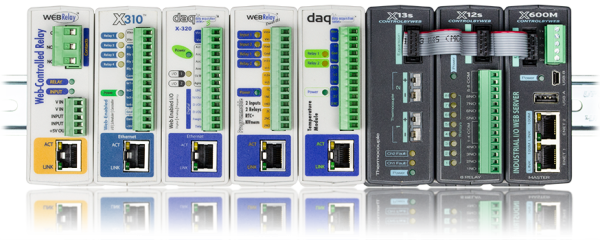
 Control By Web offers many excellent din rail mountable devices for remote control and monitoring. This plugin implements their Remote Services protocol. This plugin should be considered in beta at the moment and may not be either feature complete nor support all features of the ControlByWeb devices. It has only been tested with an older Web Relay device but should work with any of their devices that support version 2 of the Remote Services protocol.
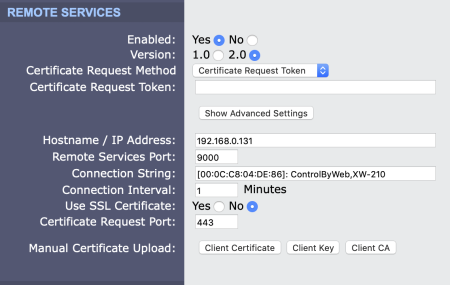
Only one instance of the plugin is required for as many ControlByWeb devices as you wish to connect. The plugin starts a server and waits for connections from the devices. An example of configuring the device is below. You can point as many devices to the server as you wish. Since XTension is listening there has to be a path for the connection to get to XTension. If connecting from outside on the internet a passthrough will have to be added to your router to let the connection be made. Since the device itself is making an outgoing connection no special configuration is needed at the device location. No router config is necessary at all if XTension and the devices are on the same subnet. While I would still recommend giving your devices a static IP on your network since they talk to XTension and not the other way around it is not strictly necessary.
NOTE: If you have trouble with the incoming connection due to encryption issues or just need to make an outgoing connection rather than wait for an incoming one please check out the Control By Web Outgoing plugin which uses a different connection method. None of the following Device Configuration is needed when using the other plugin.
Important Safety Tip:
Do not set the web interface and the Remote Services port to the same number. This will render both unusable and the only way to recover seems to be doing a factory reset.
Device Configuration:
 The specific place where this is setup may differ from one device type to another, on the WebRelay device that I have it is on the WiFi Networks setup pane of it’s setup.html page. Change Enabled to yes, set the version to 2.0 and then click the “Show Advanced Settings” button if necessary. As of this moment XTension does not support sharing a security certificate and so all communication is done in the clear. If you need to connect over the internet please let me know you need the certificate system implemented,
In the Hostname/IP Address field enter the IP address of your XTension machine.
In the Remote Services Port field enter the port that you are running the plugin on in XTension. This defaults to port 9000 but can be set to anything available on the XTension machine.
The Connection Interval field can be left at 1 minute. This is how long it can take for it to attempt to connect or re-conenct with XTension should you restart the software or the XTension machine or the network connection drops for some other reason so there is no reason to set this to a much higher number as you do not wish to have it take too long to reconnect.
Make sure the Use SSL Certificate is set to No.
Click the “Submit & Reboot” button at the bottom of the page when you’re complete. The device will now start looking for XTension to talk to.
XTension Configuration
As of this moment the only XTension setting necessary is the port number to run the server on. Once you have selected the “Control By Web” plugin from the plugin device popup and entered the same port that you used to setup the device in the step above you can save the interface and enable it in the Interface list window.
You should see a message saying something like “Control By Web Plugin v0.1 Ready on port: 9000” in the log if the plugin was able to reserve that port number for itself and everything else is working properly.
Within the next minute, or longer interval if you changed the Connection Interval setting in the Remote Services settings above, it will receive a connection from the device and begin creating Units in XTension automatically to support the endpoints the device advertises to it.
XTension Unit Configuration
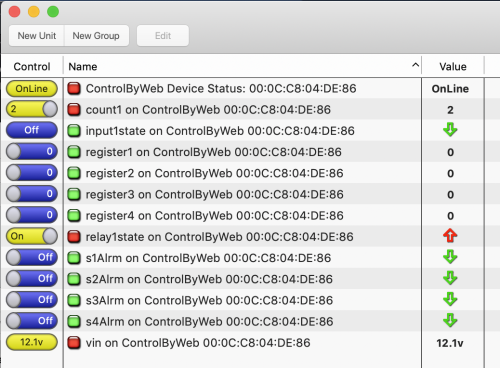
When the device connects a new Unit List will be created with the default name of “Units On ControlByWeb Device: 00:01:02:03:04:05:06” with the unique MAC address of the device in the title. The rest of the Units that are found in the data will also be added to this list. After the units are created you can rename the list to something more descriptive or just delete it entirely. Each device that you connect to XTension will get it’s own list in this way. You can also control click on the Interface in the Interface List window and select “Show My Units” to create a list named after the Interface with all the units assigned to it.
The plugin defines 2 types of Units inside of XTension. The first is the “Device Status” unit type. Each device will get one Device Status unit as seen at the top of the screen shot. It will give the availability status of the device. If the connection to the device is closed on purpose it will switch to offline immediately. If the connection was dropped because the device unexpectedly lost power or it’s network connection it may take up to 15 seconds to timeout. This unit also holds the interface to other settings unique to the device itself. If you have the device setup to require a password you can enter that by editing this unit and saving it there.
The second device type is a generic “register” type that is used for all the other control and data endpoints. An endpoint is created for all the named values included in the state.xml data that is sent from the device and so it should support any of the newer devices assuming they conform to the same conventions about controlling through the /state.xml?endpoint=value format that is used by my WebRelay device. If special handling is needed for something in a newer device please let me know and we can add support for that.
Some logic is applied to the data for example 1-wire sensors that are not configured are not created and no unit is created for the temperature units label or the device serial number. The temperature units are used to set the suffix when creating new units for temperature readings.
For some data types I know if the units need to be discrete or dimmable to hold either an on/off or a numerical value, but this may not work for newer devices and you may need to edit the unit to set this properly.
Once the Units are created in the initial connection you can re-name them to something more descriptive but you cannot delete them. If you delete the units they will be re-created when the next data poll is performed.
Controlling The Relay
For any relays that the device support a regular on/off unit will be created and you can control it in XTension like any other unit.
If you wish to use the “Pulse” feature built into the device you need to edit the relay Unit and change a few settings.
First edit the Unit and check the “Dimmable” checkbox on the first tab of settings. Then on the Display tab select “Popup Menu” from the “Control Type In Lists” field and enter the 3 comma separated values “off,on,pulse” into the next field as shown.
After saving the unit instead of a toggle switch you’ll get a popup menu from which you can select off, on or pulse. Which will send the values of 0, 1 or 2 to the device endpoint.
If scripting or creating a scheduled event to pulse the relay please use the Set Value verb and set the value to 2.
Inputs
Any inputs advertised by the device will be created automatically in XTension. By default they will be created as discrete units. If the units on your device require holding a numerical value just edit the Unit and check the “dimmable” checkbox. The device is polled over the Remote Services port every 3 seconds so it may take up to that long for a change in the input to be noticed. This could be a problem with short events where the state may return to the original within that time. If that is a problem you can also create a Counter that will be updated when the input changes state. By adding a script to it’s on script you will know that the input changed state even if the actual input unit is currently showing the same state and did not receive an update during that time. You should check to make sure the value of the counter is not 0 so that you do not perform actions on a counter reset.
Temperature Sensors
Any 1-wire sensors attached to the device will be also automatically added to XTension. They will be updated potentially as often as every 3 seconds as we poll for changed data. As of the first beta of the plugin I am not doing any standard 1-wire filtering of known error readings as I am not sure if the device will do that automatically or not. If you find that you’re getting readings of 185F in error this is a read error on the 1-wire bus and can be ignored using the Change Future Value Verb in an ON script in the unit and please let me know so that I can add such logic to the plugin itself so that won’t be necessary in the future.
The temperature units as set in the device will be automatically set as the value suffix when XTension creates the Unit but will not change automatically if you change it in the device and the Units already exist. You can update this at any time by editing the Unit and going to the Display tab.
Counters
Counters will also be created in XTension. They can be useful even if you do not having a measuring device you are tracking as mentioned in the Input section above. Counter units will be automatically created as dimmable in XTension but you can rename them and add units or anything else useful for the display. To reset a counter from XTension set it’s value to 0 or use the Turn Off verb on it and it will reset the counter in the device as well.
Counters are updated in XTension approximately every 3 seconds.
Alarms
Alarms are created in XTension as discrete units. There are 4 by default and there is no way to tell if they are in use or not so XTension will create them regardless. They are created as 2 way units even though my older device does not support setting the alarms from a remote device. If you wish to limit the sending of a command to that endpoint you can edit the unit and change it to “Receive Only” then even if it is controlled by a script or an interface to XTension no command will be sent to the device.
All Other Endpoints
If your device has more endpoints than mine XTension will attempt to create a unit to represent any endpoint that it finds in the state.xml file. If won’t know if the endpoint should be discrete or contain a numerical value and other such niceties. You will have to edit those units and set them to the proper settings for whatever the data or control point needs. Please send me such information if you need to do this though so I can add extra smarts to the plugin for future versions.
Controlling Endpoints Before The Remote Services Connection
When XTension starts up the server it will not instantly have a connection to the device. It will have to wait for the device to hit it’s reconnection interval that you configured in the Remote Services setup. During this state the Units may not be able to control the device. For example if you have a command that turns the relay on in the startup script the device is unlikely to have created the connection yet.
In this case the plugin will attempt to make a regular remote control connection to the last known IP address the device was seen at. This will include the user/password if necessary and will work as long as the IP address of the device has not changed since it was last connected.
Online/Offline Status:
As of this beta version no online/offline checking can be done for devices that were not connected when the plugin was started. If you have a valid connection to XTension and the device drops offline the device status unit will update and when the device connects again it will change back to online. If the online status unit says online and the plugin instance is stopped and then the device removed from the network after the plugin is restarted it will remain saying online even though the device has not connected yet. This is mildly confusing in some situations and will get addressed in a future version of the plugin.
History:
- The Control By Web plugin was added as a beta version in XTension version 9.4.33


